The Ultimate Guide to Mastering Riverpod for Flutter Beginners
A beginners guide to Riverpod

Are you building an app with Flutter? You will need to know and choose a state management technique. This is because you will need to share state across different parts of your app, especially as your app gets large and more complex. You will need to efficiently manage the state in your app to avoid having bugs and difficulty maintaining your app. State management may seem complicated when you are just a beginner, especially because Flutter has a huge range of state management choices. However, using Riverpod for state management will make a lot of things easier for you. With Riverpod you can manage your state elegantly, effectively separate your UI and logic code, and lots more. This beginner’s guide will take you through how to manage state in your app using the different providers that Riverpod offers.
Prerequisites
Basic knowledge of dart
A basic understanding of flutter and state management.
A code editor ( Android Studio or VScode recommended)
A mobile device or emulator to build on.
What is Riverpod?
Riverpod is a reactive caching and data binding framework. It is an upgrade of the Provider state management package. Riverpod is highly versatile, built intentionally to avoid depending on Flutter’s Buildcontext. It has one widget which is used to store the state of all it’s providers in your flutter app. The use of Riverpod brings about the proper separation of concerns, that is, separation of the UI from logic, and it improves testing.
Advantages of Riverpod
It does not depend on Flutter or it’s BuildContext. The providers in Riverpod are global variables and can be accessed from anywhere on the widget tree, you can work with your providers without having any dependency on BuildContext.
It ensures compile safety and also supports multiple providers of the same type.
There is improved performance because of the added features in Riverpod and an integrated caching system.
Providers can be auto-disposed.
Let’s talk about Providers
In Riverpod, Providers are the core of everything (Note that the provider types used in Riverpod and those used in the Provider's package are different). According to the Riverpod documentation, a provider is an object that encapsulates a piece of state and allows listening to that state.
Importance of Providers in Riverpod
Providers can be used as a complete replacement for design patterns such as dependency injection, service locators, inherited widgets, singletons.
Your code will be easier to test and you can override any Provider to behave differently during a test, to test for specific behavior.
App performance will be optimized because with Providers you can ensure that only what is affected by a state change is recomputed.
It allows easy integration with advanced features like pull to refresh.
Provider Types in Riverpod
These are the various providers and their use cases, you can consult this list to know which provider best suits what you want to achieve.
| Provider Type | Use Cases |
| Provider | A service class / computed property (filtered list) |
| StateProvider | A simple state object/ filter condition |
| FutureProvider | A result from an API call |
| StreamProvider | A stream of results from an API |
| StateNotifierProvider | A complex state object that is immutable except through an interface |
| ChangeNotifierProvider | A complex state object that requires mutability |
In this article, we will be looking at various examples which will help show you how to use the following providers:
Provider
StateProvider
FutureProvider
StreamProvider
Install the Riverpod package
Before we dive into the examples, you should have the following set up:
- Add the Riverpod package to your
pubspec.yamlas seen below. There are different variants of Riverpod but for this tutorial, we will be using the flutter_riverpod.
environment:
  sdk: ">=2.17.0 <3.0.0"
  flutter: ">=3.0.0"

dependencies:
  flutter:
    sdk: flutter
  flutter_riverpod: ^2.1.3
Then run flutter pub get
You have successfully added the Riverpod package to your project.
Next, in your
main.dartyou will need to wrapMyApp()with theProviderScopeas seen below, this widget stores the state of all your providers.void main() { runApp( ProviderScope( child: MyApp(), ), ); }
Create a Provider
Let’s look at a simple example of a provider:
// provider that returns a string value
final nameProvider = Provider<String>((ref) {
  return 'Nikki';
});
This provider is made up of three things:
nameProvideris the global variable used to access the state of this provider.Provider<String>tells us the kind of provider and the type of state it holds.A function that creates the state, this function will always receive a
refobject as a parameter.
Since Riverpod Providers have an additional ref object, there are different ways to access them in the widget tree:
Using a
ConsumerUsing
ConsumerStatefulWidget&ConsumerStateUsing a
ConsumerWidget
Using Consumer
Assuming we want to display a title text using the Provider, we can wrap the text widget with the Consumer . When you run the app, it is just the text widget that rebuilds. Doing this will optimize performance on a large scale.
Here is an example:
//We can put the title provider in a different file, and still be able to access it on the Titlepage
final title = Provider<String>((ref) => "This is our title");
class Titlepage extends StatelessWidget {
  const Titlepage({Key? key}) : super(key: key);

  @override
  Widget build(BuildContext context) {
    return Scaffold(
        backgroundColor: Colors.lightBlue,
        appBar: AppBar(
          title: const Text("RiverPod Example App"),
        ),
        body: Center(
          child: Column(
          mainAxisAlignment: MainAxisAlignment.start,
          children: [
            Consumer(
              builder: (context, ref, child) {
                  final titleText = ref.watch(title).toString();
                return Text(titleText,
                    style: const TextStyle(
                        color: Colors.white, height: 10, fontSize: 18));
              },
            ),
          ],
         ),
       )
    );
  }
}
The Consumer has the builder, which takes the context, ref, and child parameters. Before reading a provider, you need to obtain a ref object. The ref object is what allows us interact with the providers. Here, the ref object watches the title Provider you have in the other file. You can have access to the title provider by just calling watch. ref.watch is used to obtain the value of a provider and listen to changes, such that when the value changes, it will rebuild the widget or the provider subscribed to its value.
Using ref.watch, you can access the value in the provider and put it in our text widget. Once done, you have successfully used the consumer method to access your title provider.
Using ConsumerStatefulWidget
In this case instead of extending the StatefulWidget we can extend the ConsumerStatefulWidget & ConsumerState. Doing this helps us access the ref object in the widget tree, which is what we need to read our providers.
Here is an example:
//We can put the title provider in a different file, and still be able to access it on the Titlepage
final title = Provider<String>((ref) => "This is our title");
class Titlepage extends ConsumerStatefulWidget {
  @override
  ConsumerState<Titlepage> createState() => _TitlepageState();
}
class _TitlepageState extends ConsumerState<Titlepage> {
  @override
  void initState() {
    super.initState();
    // we can choose to read the provider inside initstate if necessary
    final titleText = ref.watch(title).toString();
  }

  @override
  Widget build(BuildContext context) {
    return Scaffold(
        backgroundColor: Colors.lightBlue,
        appBar: AppBar(
          title: const Text("RiverPod Example App"),
        ),
        body: Center(
          child: Column(
          mainAxisAlignment: MainAxisAlignment.start,
          children: [
           Padding(
                padding: const EdgeInsets.only(top: 30,bottom: 30),
                child: Text(titleText,
                        style: const TextStyle(
                            color: Colors.white,fontSize: 30)),
               ),
            ],
         ),
       )
    );
  }
}
Here, we can see that, by sub-classing from ConsumerState, we can access the ref object inside the widget because the ConsumerState has the Widget Ref as a property. Now we can put the titleText variable holding the instance of the title provider in the text widget and have the title display when the app is run.
For the final method which is the ConsumerWidget, we will be using it for all our examples. It is the most common method and it is recommended that you use it except where there is a need to use any of the others.
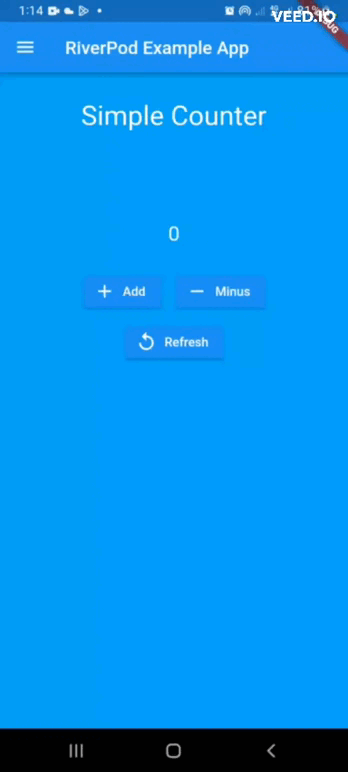
Simple Counter App
Let’s look at a simple Counter app. The counter app will consist of the following,
The title
Three buttons to add, subtract and reset the counter
The counter in the text widget. It will change its value when you click the buttons.
For this Simple Counter app example, we will use ConsumerWidget. We will extend ConsumerWidget instead of StatelessWidget:
//This is the file containing our providers

//This is the Provider, we are using it because we need to access the title text
final title = Provider<String>((ref) => "Simple Counter");
//we are using StateProvider here because the counter will be changing in state
final counter = StateProvider((ref) => 0);
class Counterpage extends ConsumerWidget {
  const Counterpage({Key? key}) : super(key: key);

  @override
  Widget build(BuildContext context, ref) {
    final titleText = ref.watch(title);
    final counterProvider = ref.watch(counter);

    return Scaffold(
        backgroundColor: Colors.lightBlue,
        appBar: AppBar(
          title: const Text("RiverPod Example App"),
        ),
        body: Center(
          child: Column(
              mainAxisAlignment: MainAxisAlignment.start,
              children: [
              Padding(
                padding: const EdgeInsets.only(top: 30,bottom: 30),
                child: Text(titleText,
                        style: const TextStyle(
                            color: Colors.white,fontSize: 30)),
              ),

               Text(
                counterProvider.toString(),
                style: const TextStyle(color: Colors.white, height: 5, fontSize: 23),
              ),
          Row(
              mainAxisAlignment: MainAxisAlignment.center,
              children: [
                Padding(
                  padding: const EdgeInsets.all(8),
                  child: ElevatedButton.icon(
                    icon: const Icon(Icons.add),
                     label: const Text('Add'),
                      onPressed: ()=> ref.watch(counter.notifier).state++,
                ),
                ),

                Padding(
                  padding: const EdgeInsets.all(8),
                  child: ElevatedButton.icon(
                    icon: const Icon(Icons.remove),
                    label: const Text('Minus'),
                    onPressed: ()=> ref.watch(counter.notifier).state--,
                  ),
                ),
              ],
            ),
            ElevatedButton.icon(
              icon: const Icon(Icons.replay),
              label: const Text('Refresh'),
              onPressed: ()=> ref.watch(counter.notifier).state = 0,
            ),
          ],
         ),
            )
            );
      }
}
Because we used ConsumerWidget, you can see that the widget build method comes with an additional ref property which is to be used to watch the providers. Using the ref, we can access the counter and the title providers, as seen in the code above. To perform the increment, decrement, and, reset functions to the counter, we use ref.watch(counter.notifier).state to access its state and carry out the operations accordingly.
We can see how we effectively used the Provider and StateProvider to achieve a simple counter app. Run this code and you should have your counter app working. It should look like this:
Simple Product List
Next, we will look at an app with a simple list of products that you can filter by name or price at the click of a dropdown button.
The app will consist of
A Listview that displays all the products.
A dropdown button on the app bar for filtering the products according to name or price.
First, we would create a Product class and a list of the products.
class Product{
  Product({required this.name, required this.price});

  final String name;
  final double price;
}

final _products = [
  Product(name: "Spagetti", price: 10),
  Product(name: "Indomie", price: 6),
  Product(name: "Fried Yam", price: 9),
  Product(name: "Beans", price: 10),
  Product(name: "Red Chicken feet", price: 2),
];
Next, to sort the list of product items using the dropdown, we will need an Enum, explicitly stating the two sorting types.
enum ProductSortType{
  name,
  price,
}
We will need to use a StateProvider to synchronize the state of the dropdown with our Provider.
//This is the default sort type when the app is run
final productSortTypeProvider = StateProvider<ProductSortType>((ref) =>
ProductSortType.name);
Then we will need to create a FutureProvider that will show the list of products after every 3 seconds, then update the FutureProvider with the StateProvider to handle the sorting of the products.
final futureProductsProvider = FutureProvider<List<Product>>((ref) async {
  await Future.delayed(const Duration(seconds: 3));
  final sortType = ref.watch(productSortTypeProvider);
switch (sortType) {
    case ProductSortType.name:
       _products.sort((a, b) => a.name.compareTo(b.name));
       break;
    case ProductSortType.price:
       _products.sort((a, b) => a.price.compareTo(b.price));
}
  return _products;
});
From the code above we are saying:
⇒ Provide the List of product items in 3 seconds and then use the switch case function to alternate between when:
productSortTypeProvider = StateProvider<ProductSortType>((ref) => ProductSortType.name);
And when:
productSortTypeProvider = StateProvider<ProductSortType>((ref) => ProductSortType.price);
If neither of the two cases is true, then it just returns the products as we have them on the list.
We have been able to use both the StateProvider and FutureProvider to achieve our goal, this can be seen as the logic part of our project and we can put the whole code in one file.
You can see that using Riverpod we have successfully been able to separate our logic code from UI. Now let’s look at the UI part of the code.
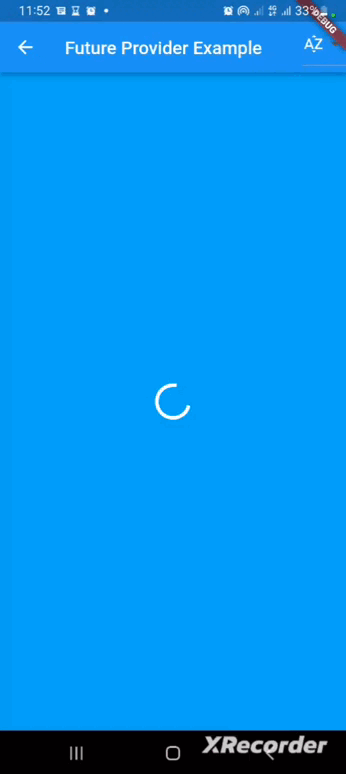
We will need:
an AppBar for holding our dropdown buttons for the sorting of the products
a listview containing the list of products
appBar: AppBar(
          title: const Text("Future Provider Example"),
          actions: [
            DropdownButton<ProductSortType>(
              dropdownColor: Colors.brown,
              value: ref.watch(productSortTypeProvider),
                items: const [
                  DropdownMenuItem(
                    value: ProductSortType.name,
                    child: Icon(Icons.sort_by_alpha),
                ),
                  DropdownMenuItem(
                    value: ProductSortType.price,
                    child: Icon(Icons.sort),
                  ),
                ],
                onChanged: (value)=> ref.watch(productSortTypeProvider.notifier).state = value!
            ),
          ],
        ),
Here, we can see that by using ref.watch on our productSortTypeProvider we can access its value and each of the buttons of the dropdown can have either of the values so that when you click on it, the sorting action is performed. Next, let’s look at the List of products in the Listview:
final productsProvider = ref.watch(futureProductsProvider);

productsProvider.when(
            data: (products)=> ListView.builder(
                itemCount: products.length,
                itemBuilder: (context, index){
                  return Padding(
                    padding: const EdgeInsets.only(left: 10,right: 10,top: 10),
                    child: Card(
                      color: Colors.blueAccent,
                      elevation: 3,
                      child: ListTile(
                        title: Text(products[index].name,style: const TextStyle(
                            color: Colors.white,  fontSize: 15)),
                        subtitle: Text("${products[index].price}",style: const TextStyle(
                            color: Colors.white,  fontSize: 15)),
                      ),
                    ),
                  );
                }),
            error: (err, stack) => Text("Error: $err",style: const TextStyle(
                color: Colors.white,  fontSize: 15)),
            loading: ()=> const Center(child: CircularProgressIndicator(color: Colors.white,)),
        ),
Here, we can see that using the ref.watch we can access the FutureProvider. Riverpod also provides a very elegant method of handling a future response using a .when which returns data, loading, and error, in this way every possible response is handled. When the data response is gotten in the listview we can now access the products list and have it show in the list view as shown above.
This is the full UI code
class ProductPage extends ConsumerWidget {
  const ProductPage({Key? key}) : super(key: key);

  @override
  Widget build(BuildContext context, ref) {
    final productsProvider = ref.watch(futureProductsProvider);

    return Scaffold(
        appBar: AppBar(
          title: const Text("Future Provider Example"),
          actions: [
            DropdownButton<ProductSortType>(
              dropdownColor: Colors.brown,
              value: ref.watch(productSortTypeProvider),
                items: const [
                  DropdownMenuItem(
                    value: ProductSortType.name,
                    child: Icon(Icons.sort_by_alpha),
                ),
                  DropdownMenuItem(
                    value: ProductSortType.price,
                    child: Icon(Icons.sort),
                  ),
                ],
                onChanged: (value)=> ref.watch(productSortTypeProvider.notifier).state = value!
            ),
          ],
        ),
      backgroundColor: Colors.lightBlue,
      body: Container(
        child: productsProvider.when(
            data: (products)=> ListView.builder(
                itemCount: products.length,
                itemBuilder: (context, index){
                  return Padding(
                    padding: const EdgeInsets.only(left: 10,right: 10,top: 10),
                    child: Card(
                      color: Colors.blueAccent,
                      elevation: 3,
                      child: ListTile(
                        title: Text(products[index].name,style: const TextStyle(
                            color: Colors.white,  fontSize: 15)),
                        subtitle: Text("${products[index].price}",style: const TextStyle(
                            color: Colors.white,  fontSize: 15)),
                      ),
                    ),
                  );
                }),
            error: (err, stack) => Text("Error: $err",style: const TextStyle(
                color: Colors.white,  fontSize: 15)),
            loading: ()=> const Center(child: CircularProgressIndicator(color: Colors.white,)),
        ),
      )
    );
  }
}
When you run your code, it should look like this:
Simple Timer
Finally, let's take an example of a Stream Provider, where we will have a simple timer, that on each second strike, changes the colour of the background randomly.
First, we will need to create a StreamProvider and use the stream.periodic to execute a timer function every second. Let’s look at this in code.
Duration duration = const Duration();

final timer = StreamProvider.autoDispose((ref) => Stream.periodic(
  const Duration(seconds: 1), (_) => addTimer(ref)
)
);
final addSeconds = StateProvider((ref) => 1);

void addTimer(ref){
  final seconds = ref.watch(addSeconds.notifier).state + duration.inSeconds;
  duration = Duration(seconds: seconds );

}
Here, we can see that using the StreamProvider, at every second the Stream.periodic executes the addTimer function. Then using the StateProvider, in the addTimer function we can increase the duration by 1 every 1 second. We also appended the .autoDispose modifier to dispose the provider when it’s not in use.
Let’s look at the UI code:
class TimerPage extends ConsumerWidget {
  const TimerPage({Key? key}) : super(key: key);

  @override
  Widget build(BuildContext context, ref) {
    final streamCount = ref.watch(timer);
    String twoDigits(int n,)=> n.toString().padLeft(2,"0");
    String minutes = twoDigits(duration.inMinutes.remainder(60));
    String seconds = twoDigits(duration.inSeconds.remainder(60));
    String hours = twoDigits(duration.inHours);
    final _backGroundColor = Colors.primaries[Random().nextInt(Colors.primaries.length)];

    return Scaffold(
      backgroundColor: _backGroundColor,
      appBar: AppBar(
        title: const Text("Stream Provider"),
      ),
      body: Column(
          children: [
            streamCount.when(
            data: (value){
              return Container(
                alignment: Alignment.center,
                margin: const EdgeInsets.only(left: 40,right: 40,top: 50,bottom:20 ),
                height: 300,
                width: 300,
                decoration: BoxDecoration(
                    shape: BoxShape.circle,
                    border: Border.all(
                      color: Colors.white,
                      width: 5,
                    )),
                child:  Text(
                  "$hours:$minutes:$seconds",
                  style: const TextStyle(
                    color: Colors.white,
                    fontSize: 40,
                  ),
                ),
              );
    },
            error: (error, stackTrace) => Text(error.toString()),
            loading: () => const Center(child: CircularProgressIndicator(color: Colors.white,)),
        ),
Here, we can see that using ref.watch we can access the timer StreamProvider. Then we use the twoDigits function to format the stream response to two digits. From the twoDigits function, we can get our Minute, Second, and Hour formatted respectively. Then for the background color, we create a variable _backGroundColor that will hold the value for the background color which would change at random every second. In the StreamProvider we can also handle our response neatly, when we use the .when which returns data, loading, and error, we can simply show what we would like to have for any of these responses as we did in the code above.
When you run your code, it should look like this:

Recap
We have come to the end of this tutorial. So far, we have learned that,
Riverpod is an improved version of the Provider package and takes care of most of the Provider’s shortcomings.
Riverpod has different provider types for various use cases, so before you choose a particular provider, you should be sure it will help you accomplish your goal.
You can use
Consumer,ConsumerWidgetorConsumerStatefulWidgetto access providers in your app.The ref object is what lets us interact with the providers.
Conclusion
Congratulations!!💃🏽 You have learned how to use most of Riverpod Providers, with this there is already so much you can do! However, The latest release of Riverpod, version 2.0, offers exciting new features that can greatly enhance your state management. With the addition of (Async) Notifier Providers and the Riverpod code generator, your state management can be significantly more efficient. If you're interested in learning about these new features and incorporating them into your workflow, check out the guide below.
Do well to like if the content was of help to you. If you spot any mistakes, you can kindly let me know. I’m looking forward to seeing your feedback. Cheers!
You can reach me on Twitter for more updates.


