Rive Animation for Flutter: A Beginner's Guide to Creating Stunning Animations with Ease!


Animations typically increase the visual appeal of an app or website and improves overall engagement of the users. According to a study by Forrester Research, websites with well-executed animations, experience an increase in user engagement by up to 400%. Engaging animations can capture users' attention and encourage them to interact more with the platform. However, there is a learning curve for developers to master animation, especially when working with more advanced animation tools and techniques.
Grasping Rive as a developer with no experience in animation can be relatively easy compared to other animation tools or frameworks. Rive (formerly known as Flare) is designed to be user-friendly and accessible to developers, even those with little or no prior animation experience. In this article, you will learn how to create simple stunning Rive animations with ease and manage them in your Flutter app.
Introduction To Rive🧙♂️
Rive is a powerful and user-friendly animation tool and runtime engine that enables developers and designers to create stunning and interactive animations for various platforms, including mobile apps, web applications, and games.
Basic concepts in Rive🧗
Here are the key concepts:
Artboard: An artboard is a canvas where you create your animation. It is the primary place for creating and organizing animation elements, such as groups, constraints, bones, etc.
Timeline: The timeline is where animations are defined. It allows you to set keyframes and specify how objects should change over time. Keyframes represent specific points in time where an object's properties are explicitly defined. The animation system interpolates between keyframes to create smooth transitions.
State Machine: Rive has a state machine feature that allows you to specify different states for your animation. You can trigger State transitions based on user input, or other conditions, enabling the creation of interactive animations with different behaviors based on the current state.
Code Export: Rive allows you to export animations as code, which makes it easy to integrate them into your applications. For Flutter developers, Rive offers a Flutter runtime and integration package that facilitates using Rive animations in Flutter projects.
A Simple Interactive Login Animation🚀
We will go through the process of creating a simple login animation and exporting it to our Flutter app. We will use the StateMachine to manage the interactivity of this animation in the app. In the end, it should look like this 👇🏽

Set up the element on your Artboard📃
Follow the steps below to set up the element on the Rive artboard:
First, we will need to get the element itself. I got it from User Personas illustration Templates on Figma. Export the element as an SVG file.
Go to Rive Click on the GetStarted button to open your drafts
In your drafts, create a new file and select a blank artboard.
Drag and drop the element unto the artboard, it will automatically be added to the assets folder and you can see it placed on your artboard, it should look like this 👇🏽
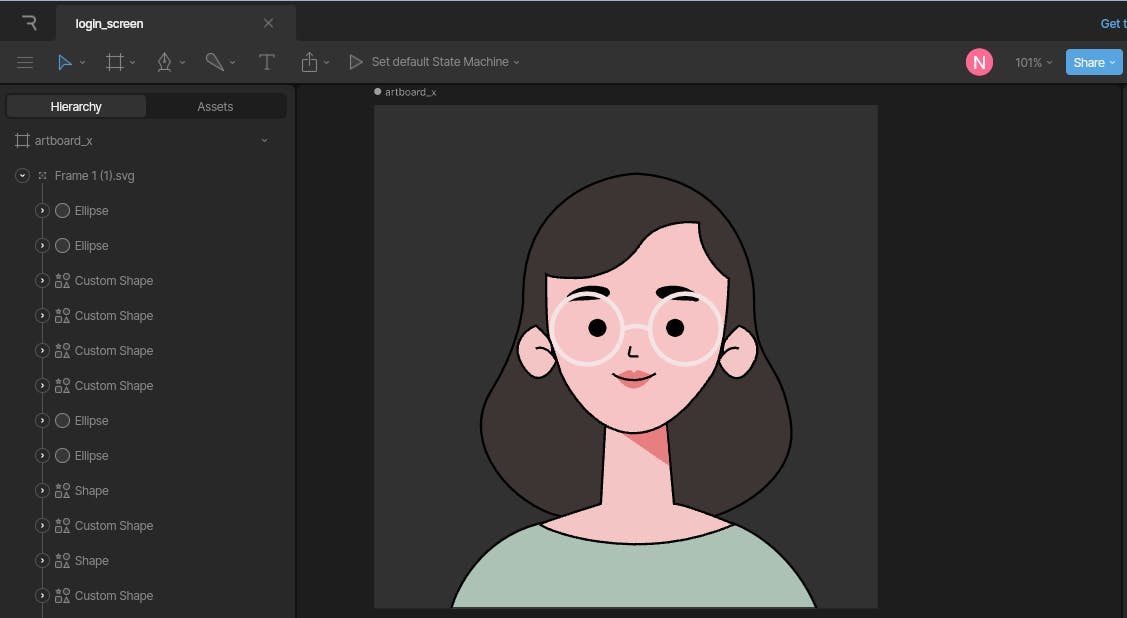
- On the side bar, we will Group the different shapes that make up this element and name them accordingly. Select all you want to group using Ctrl or Ctrl + shift. When you select it, use Ctrl + G to group them. It should look like this 👇🏽

Now we will add bones to this element. Bones help to create more dynamic and realistic animations. Considering how we want this animation to turn out, we will add bones to the neck and chest to create an illusion of breathing. We will also add bones to the hair because we want the hair to move slightly as well.
Select the bone tool at the top left corner or use Ctrl + B. After adding bones, it should look like this 👇🏽
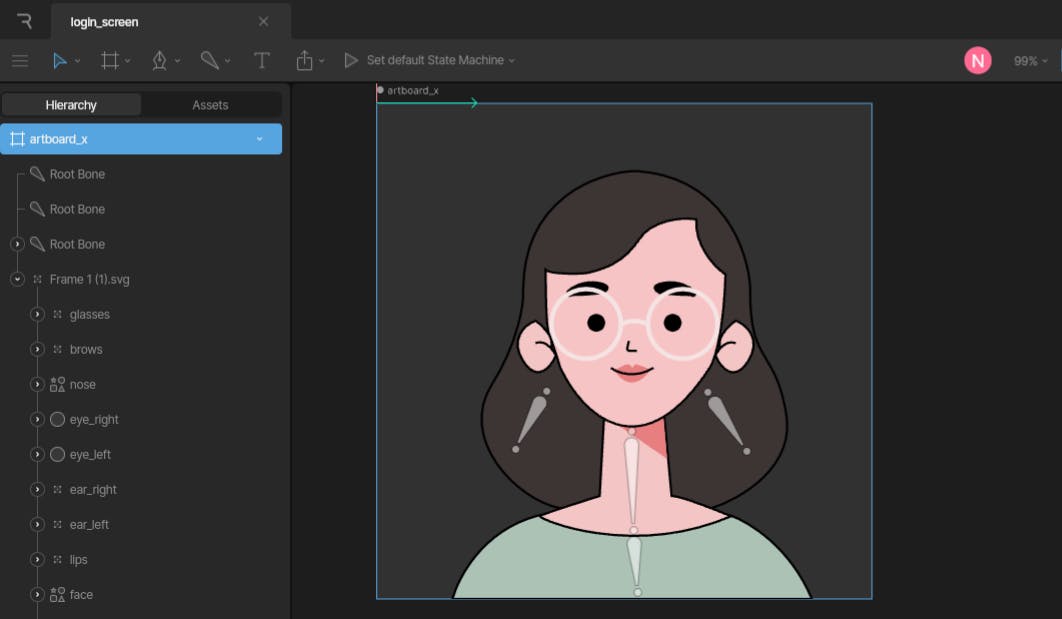
- Now we will rename the bones for easy identification. We will also group all the elements of the face and name this new group face. Using hierarchical relationships, we can connect the bones to the parts of this element we need to affect or deform. We can do this by moving the bones to the shapes they directly affect. To move a group or bone, select and move it using your mouse. It will look like this 👇🏽
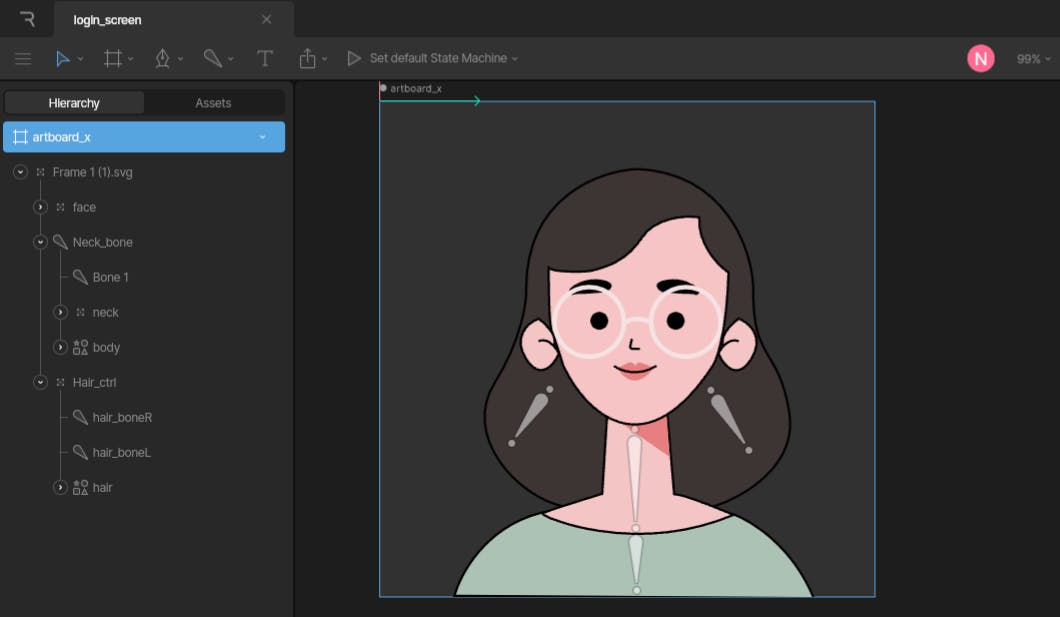
Next, we will bind our bones and weigh them. Binding ensures that when a bone moves, the corresponding parts of the character's surface move accordingly, creating the illusion of deformation. Weighting, also known as vertex weighting, involves assigning influence values (weights) to each vertex of the character's mesh based on its proximity to specific bones. We will navigate to the path of the shape we would be binding. For the neck, this is how we bind it to the neck bone.

After binding the bones, we set the vertices by assigning weights to them. Here, notice that we have put the last set of vertices on 50% because we want the two bones to have a 50% effect on them. You should use 50%, especially when the set vertices cover a section that affects the two bones. Now, we would do the same for the hair path. We will also change the left and right bones from one to two bones to help us achieve the flowy movement we want for the hair.
We would want to have a blinking effect in this animation, to achieve this, we will use the clip feature on the two eye shapes like this 👇🏽

Next, we will add head tracking using translation constraints to this element because we want to move the head during the animation. Since it is a 2d element, adding translation constraints will give it depth and some form of 3d effect. Select everything and group it. Now we have a single group.
Then, at the top left corner, select the group tool and create a group at the center of the head (at the nose area). On the toolbar on the right, change its style from group to target, name it ctrl_front, duplicate it, and name the duplicate ctrl_back.
For the target ctrl_back, select the constraints option from the toolbar on the right. Pick translation constraints from the list of constraints options available. Click on the icon before the selected constraint option to set its properties.
Set strength to -100 and set its target to ctrl front. Now when you move the ctrl front, the ctrl back moves in the opposite direction. It will help us set constraints for parts of the face that should move in an opposite direction, like the ears. It should look like this 👇🏽

Now we will set constraints for the rest of the face. We will also group the eyes (left and right) and ears (left and right) to help us manage them better. We will set constraints for the eyes like this 👇🏽

- Notice how we first set the origin of the eyes group to be the same as that of the ctrl_front. So that when we move the ctrl_front target, the eyes group that is now constrained to this target will move with it without jumping around awkwardly. We will do the same for the following:
| Group | Constraint strength | Origin position | Target |
| glasses | 5% | same as ctrl_front origin | ctrl_front |
| brows | 10% | same as ctrl_front origin | ctrl_front |
| ears | 5% | no need to set origin | ctrl_back |
| nose | 5% | same as ctrl_front origin | ctrl_front |
| face | 5% | same as ctrl_front origin | ctrl_front |
We don’t need to set constraints for the lips.
This is how it looks after we finished adding all our constraints 👇🏽

💃🏽 🥳 Congratulations, we have successfully gotten our element ready for the kind of animation we want to achieve. Whew!!
Animation Time!🕶️
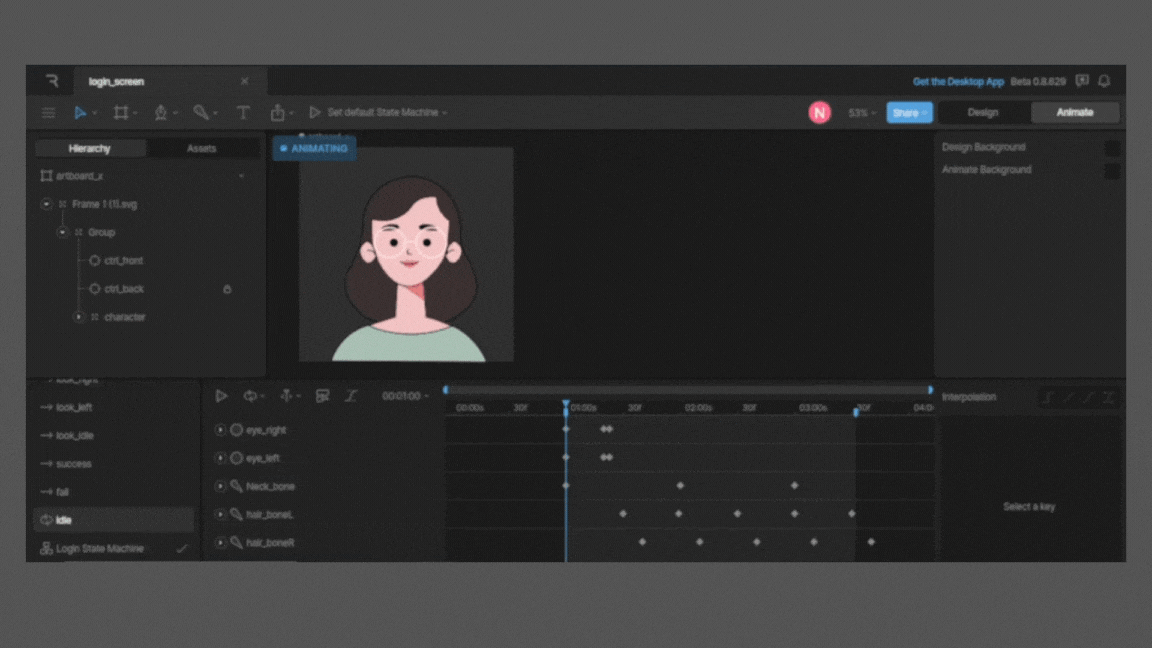
On the toolbar at the right, click the Animate button to switch to the animation interface. We will create six animation timelines and tie everything up with a state machine. In the timeline, using what we have set up previously with bones and constraints, we can set keyframes to create the animation we want to achieve.
The first timeline animation is the idle animation. It will be the Idle state of the animation. We will use this when the animated element is not engaged.
First, we group all the parts of our element and name it character before starting the animation process.
Then we set the duration to 4 minutes,
set our Workarea, and set the timeline type to loop. It is ideal for an idle animation.
For this idle animation, we will create an illusion of breathing, slight hair movement, and blinking. Using the neck bone, hair bones, and right/left eye elements, we will set the necessary keyframes in different poses, which means we can set the specific properties of the selected item on the points on the timeline. Considering the transition style from one keyframe to the next, we will choose the kind of interpolation we need. You can find it at the bottom towards the right of the Timeline section. The interpolation is either hold, linear, or curve, depending on how you want to move from one keyframe to the next. It will look like this 👇🏽

From the gif above, you can notice that on the different keyframes on the timeline, we have set different poses for the selected items. This transition from one keyframe to the other forms the animation. Using this same procedure, we will create the other five timelines. You can click here to see this animation and check out the different timelines in detail. It looks like this 👇🏽
Set up your State Machine🏍️
We have come to the final part of this animation process. A state machine is a visual way to connect animation. Using the state machine, we can control which animation plays based on the input we set. We can mix or blend two or more timeline animations so that they play simultaneously. We must select the right kind of inputs in the state machine because this is what we will use to control the animation in the app.
In the state machine, we have three kinds of inputs:
Number: A number input is a numeric value used in a state machine to represent and control quantitative data. You can set the state machine to transition to a particular state depending on the number input numeric value.
Boolean: A boolean input is a binary value that can be true or false. Now the state machine transitions to a particular state depending on the input value, either true or false.
Trigger: A trigger input is an input used to signal an event. Unlike boolean inputs that maintain their state until explicitly changed, triggers reset to their default state after being triggered.
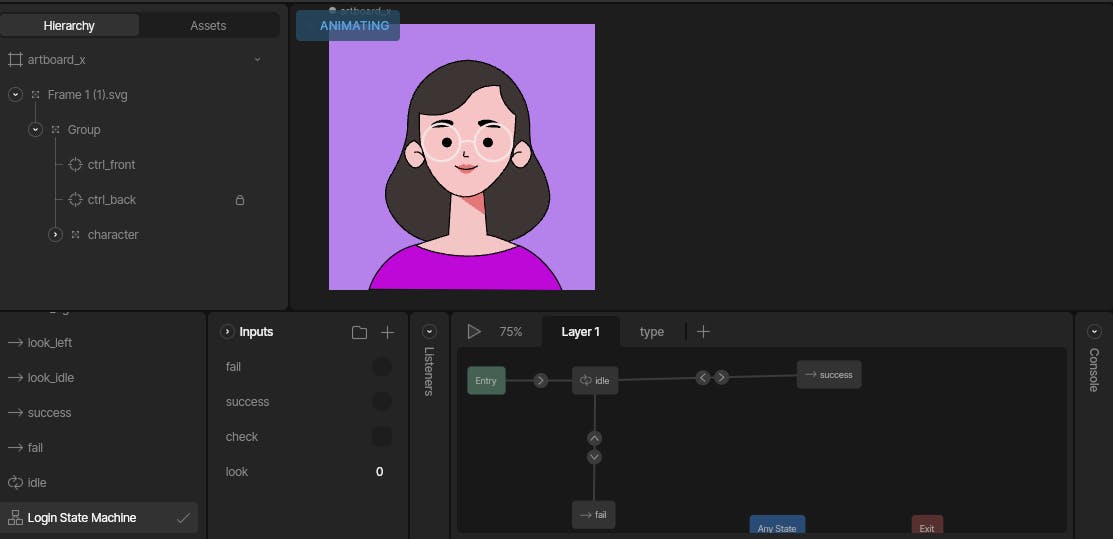
On the Animation panel, click the plus button and create a State machine. We will name it Login State Machine. This name is important because that is what we will need to identify our state machine later in the code.
Follow the steps below to set up your state machine:
Create two layers in our State machine and rename one to Type. Multiple layers help us play several states at the same. To get another Layer in your state machine, click the plus icon at the top of the StateMachine graph.
On the Inputs section, you should see it labeled just beside the state machine. Click the plus icon, select a number input, and name it look. We will use this input while blending (mixing) the look_left and look_right timeline animations so that as the numbers increase, it seems like the character is looking from left to right.
Create another input, this time a boolean, and name it check. It controls when we want the animation to look. Create two trigger inputs, rename one fail and the other success. You will need this to trigger the success and fail states.
Now drag and drop the look_ idle animation and the look_left animation on the Type layer graph. On this graph, you will see some default states:
Entry - This is the entry point of any animation state connected to this state.
Exit - This is the exit point of any animation state connected to this state
Anystate - Any animation state connected to this gets played as long as it meets the conditions in the transition.
The transition is the line and arrow connecting two or more states. Looking at the arrow direction, you can see how the states are now connected. When you click on this, you can see the properties of the transition. In the properties, you can create a condition. Using any of the input you created previously, you can define that condition you wish must be fulfilled before the next state in the transition.
In the type layer, connect the Entry, look_Idle, and look_left states using transition linearly. For look_left state, we would want it to be a blend of the look_left and look_right animation. To do this, select the look_left state on the graph, and on the left side of the panel, pick Blend 1d. For the input option, select the look input. This input will control our blend. Then in the Timelines section, select the look_left and look_right timelines, and set them to 0 and 100. When you increase the look input figure, it blends the two animations.
Connect the blend state to the look_idle using the transition line and arrow. Now click the arrow and set the condition to when the check input is false. It will help us control to animation and tell the StateMachine, to show the look_idle state when the check boolean is false. Do the same for the transition arrow pointing from look_idle back to the blend state, but now check boolean is set to true.
Now when you click on the check box for the check input, you can set it to true or false. When you play the state machine, it will keep showing the look_Idle state till you change the check boolean to true, then it will start the look_left animation. To blend look_left and look_right, you increase the Look input number value.
Now in Layer1, this is where you’ll add the success and fail triggers. From the entry state, you will connect the idle state. From the idle state, connect both success and fail states. In the transition from idle to the success state, add a condition. In this condition, add the success trigger input. It is saying that the state machine should play the success animation only when the success input is triggered.
Do the same for the fail state transition but add the fail trigger in the condition instead. Now from the success, create a transition line back to the idle. Here select Exit time, and set it at 100%. It means the idle animation will only play when the success animation has finished playing. Do the same for the fail back to idle transition.
Now the complete animation in state machine will look like this 👇🏽

Check out the full animation and State machine here.
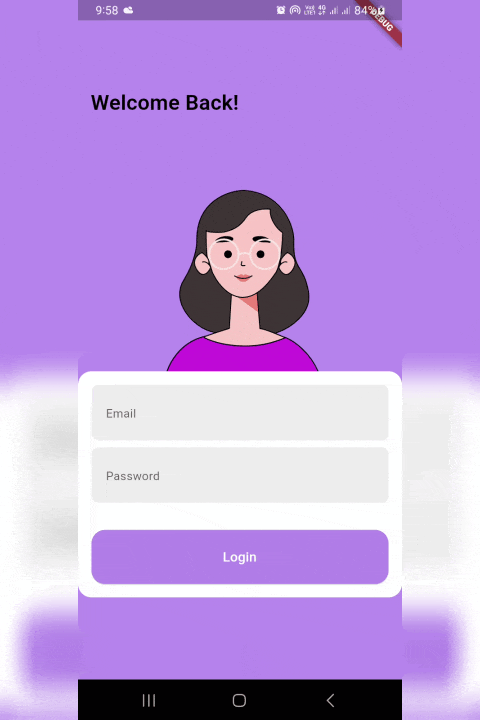
Congratulations 🥳, we have successfully animated our element and set it up with a state machine! However, before we export the rive file, we will change the background and the character’s shirt colors. It will look like this👇🏽
The background color is (#B581EB) and the character’s shirt color is (#BD08D7)
Here is the link to the animation to see everything in detail
Implement Animation in your Flutter App👨🚒
We will use this animation on our Login page. Create a Flutter app project and add the Rive dependency to the pubspec.yaml
dependencies:
  rive: ^0.11.12
Also, add the exported Rive file to your project assets. Now we can go ahead to create the UI based on our design. We aim to have the animation do the following:
react with the success animation when the email/password is correct
react with the fail animation when the email/password is wrong
respond with the direction of the cursor in the text field
We will first define some things before the Widget Build function.
///Login details
  String emailCred = "nikki@gmail.com";
  String passwordCred = "123456";

  /// input form controller
  FocusNode emailFocusNode = FocusNode();
  TextEditingController emailCtr = TextEditingController();

  FocusNode passwordFocusNode = FocusNode();
  TextEditingController passwordCtr = TextEditingController();

  /// rive controller and input values
  StateMachineController? controller;

  SMIInput<bool>? check;
  SMIInput<double>? look;
  SMIInput<bool>? success;
  SMIInput<bool>? fail;

  bool isLoading = false;
  bool isError = false;

  @override
  void initState() {
    emailFocusNode.addListener(emailFocus);
    passwordFocusNode.addListener(passwordFocus);
    super.initState();
  }

  @override
  void dispose() {
    emailFocusNode.removeListener(emailFocus);
    passwordFocusNode.removeListener(passwordFocus);
    super.dispose();
  }

  void emailFocus() {
    check?.change(emailFocusNode.hasFocus);
  }

  void passwordFocus() {
    check?.change(passwordFocusNode.hasFocus);
  }
Here, we can note the following:
The correct email and password are defined.
The focus node and text editing controller for the email and password are defined too.
Here the Rive controller and inputs are defined as nullable. You notice that the inputs are defined using the exact name they use in the state machine.
The loading and error boolean is defined.
In the
emailFocusandpasswordFocusfunctions, the check input is changed based on the booleanFocusNode.hasFocusThen in the
initStateanddisposefunctions, we see the Listeners are added and removed. The listeners are used to listen to focus change.
You can check out the code for UI and the rest of the code here. This piece of code shows how to add the RiveAsset:
SizedBox(
              height: 250,
              width: 250,
              child: RiveAnimation.asset(
                "assets/login_screen.riv",
                fit: BoxFit.fitHeight,
                stateMachines: const ["Login State Machine"],
                onInit: (artboard) {
                  controller = StateMachineController.fromArtboard(
                    artboard,
                    "Login State Machine",
                  );
                  if (controller == null) return;
                  artboard.addController(controller!);
                  check = controller?.findInput("check");
                  look = controller?.findInput("look");
                  success = controller?.findInput("success");
                  fail = controller?.findInput("fail");
                },
              ),
            ),
From the code above, we can note the following:
The StateMachine has the same name we named it in the Rive editor
The controller and inputs are defined
Here is the code for the login function:
void login()async{
//extract the text coming from the text fields
    final email = emailCtr.text;
    final password = passwordCtr.text;
//Set loading boolean to true and delay to give an illusion of loading
    setState(() {
      isLoading = true;
    });
    await Future.delayed(
      const Duration(milliseconds: 2000),
    );
// check if details entered is the same as the correct creditials defined
    if (email == emailCred && password == passwordCred) {
//if correct trigger the success input and set error boolean to false
      success?.change(true);
      setState(() {
        isError = false;
      });
      if(context.mounted){
// delay and navigate to home screen
        await Future.delayed(
            const Duration(seconds: 2),(){
          Navigator.push(context,
              MaterialPageRoute(builder: (context) =>const HomeScreen()));
        });
      }

    } else {
// if details don't match defined credentials
// set error boolean to true and trigger the fail input
// set loading boolean to false
      setState(() {
        isError = true;
      });
      fail?.change(true);
    }
    setState(() {
      isLoading = false;
    });

  }
Check out the complete code here.
By doing this, we have completed our Login animation code. Here is how everything looks:
Conclusion🏋️♀️
Congratulations! We have completed this simple interactive login animation. Here is an overview of everything we were able to accomplish:
Set up our element on the Rive artboard,
Create different animated states of this element,
Put all these states together with the help of the state machine
Export and add it to the Flutter app
Following this tutorial step by step, you might face a few bottlenecks, but it will get easier with practice. You can reach me on Twitter or comment if you need help while following through with this tutorial.
Check out these video tutorials to get a better grasp of Rive animation
You can also check out the Rive channel for several video tutorials on Rive animations.